Introduction
Accepting input from users through the use of HTML forms is a common task in almost any web application. When a web application form is lengthy or detailed in nature, it may be a good idea to display a confirmation of the values the user entered, prior to submitting the data. Rather than navigating the user away from the form to display the confirmation, web applications can take advantage of javascript (particularly jQuery and jQuery UI) to display a modal popup dialog containing the form field values. The user can confirm the fields and choose to make changes or submit the data.
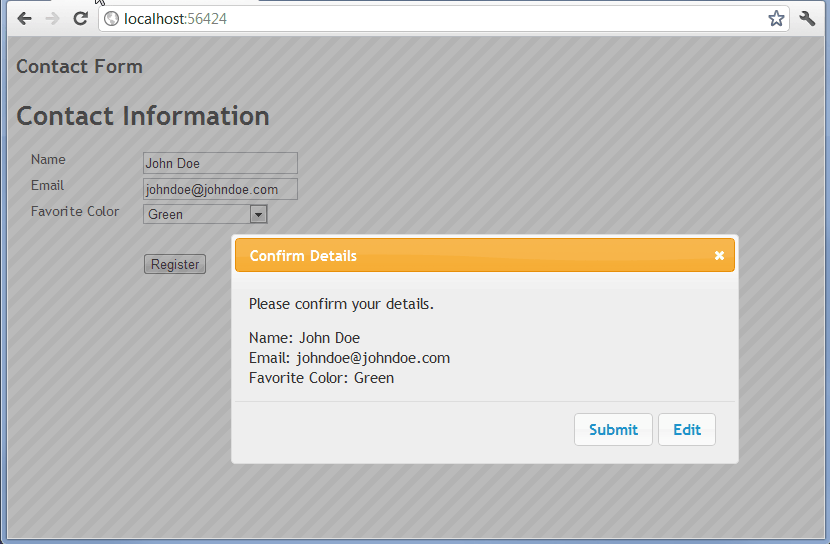
In this tutorial, we’ll walk through the steps of creating an easy confirmation modal dialog with C# ASP .NET MVC3, jQuery, and jQuery UI. Our confirmation dialog will display all form fields that contain values (leaving any fields without values hidden). It will allow the user to click Edit to close the dialog and make changes, or click Submit to submit the data to our web application for processing. Upon clicking Submit, the modal dialog’s button will automatically disable to prevent duplicate submissions. Our form confirmation dialog will also automatically grab the values from textboxes, dropdown select lists, and checkbox fields to display the confirmation data.
See It In Action

Setting Up the Includes
Before getting started, we’ll need to add a few javascript and CSS files to our projects. We can take advantage of the jQuery CDN (content distribution network) hosted links to use the libraries in our C# MVC web application. In our example, we’ve modified the _Layout.cshtml file to include the following lines:
1 | <link href="@Url.Content("~/Content/jQueryUI/jquery-ui-1.8.18.custom.css")" rel="stylesheet" type="text/css" /> |
The above simply includes references to the jQuery and jQuery UI libraries, as well as their associated CSS code. This is required for our form validation and modal confirmation dialog.
A Simple Model
We’ll use the following simple C# MVC model for our example form:
1 | public class Contact |
Our Contact class will let the user enter their Name, Email, and favorite Color. We’ve included some simple data annotations to validate the three fields. Note, Color_ID will actually be a drop-down list, populated from our helper method ColorManager.GetColorList(). This method is defined as follows:
1 | public static class ColorManager |
The above is a simple helper method to return a list of drop-down elements to populate our HTML select element. You would most likely load this list from your database in a production C# ASP .NET MVC web application.
With our model defined, we can now begin the HTML form.
Our Easy HTML Form
Our HTML contact form can be defined in our MVC web application, using Razor code, as follows:
1 | @using (Html.BeginForm("Index", "Home", FormMethod.Post, new { id = "contactForm", name = "contactForm" })) |
Note, we’ve included validation elements for each model field. The Name and Email fields are required fields, while the Color is an option field. This will allow us to test the jQuery modal confirmation dialog to see the different values populated.
Our Form Controller
Once we create our MVC controller, we can successfully submit the form data for processing. We’ll then add our confirmation dialog. The code for the controller is shown below:
1 | public class HomeController : Controller |
Our controller has two action methods. The first one is for rendering the initial form with a blank Contact object (upon an HTTP GET request). The second action is for submitting the form. Fairly simple.
A Form Submit Modal Confirmation Dialog
For our jQuery form confirmation dialog, we’ll need to add a small block of HTML to our page to draw the dialog.
1 | <div id="confirmDialog" title="Confirm Details"> |
It’s as simple as that. We create a div for our jQuery UI modal dialog and include a set of child div elements - one for each form field. If a form field has no value, we’ll hide the element div. Otherwise, the user will see the fields and can make changes or submit the form.
Next, we need a little Javascript to power our confirmation dialog.
Populating the Confirmation Dialog with Data
When our modal form confirmation dialog displays, we can populate the fields to allow the user to confirm the form data, using the following javascript hook on the form.submit() event. This idea orginates from Jensbits modal dialog post:
1 | $(document).ready(function () { |
The above jQuery code hooks onto the form.submit() event to display the modal confirmation dialog. It goes through each form field and populates the value for the form field element. If the value is empty, we hide the parent container div. This allows our confirmation dialog to only display fields with values entered, offering easy viewing for users confirming their data. Upon clicking the Submit button in the confirmation dialog, we call the underlying form’s submit method, which bypasses the jQuery call, and submits the form data to our C# MVC web application for processing.
Download @ GitHub
You can download the project source code on GitHub by visiting the project home page.
About the Author
This article was written by Kory Becker, software developer and architect, skilled in a range of technologies, including web application development, machine learning, artificial intelligence, and data science.
Sponsor Me