Introduction
Validating web forms is a common task of almost any C# MVC ASP .NET web application. Typically, form field validation is implemented in MVC web applications through the use of .NET data annotations on class member fields. While data annotations offer a powerful and maintainable feature for adding form validation to a web application, occasionally more flexibility is required for adding and removing form field validation in a more dynamic fashion. Some examples might include driving C# MVC form field validation from a content management system CMS, allowing control by the user, or allowing 3rd-party tools to modify form validation. In these cases, a dynamic method is required to offer dynamic data annotation form validation through an external file.
In this tutorial, we’ll walk through dynamically loading C# MVC .NET data annotations for form validation from an XML file. The XML file will specify types of validation (required fields, comparison fields, regular expression fields, error messages, show/hide, etc) and be loaded at run-time into the web application. The XML file will configure which data annotations will be automatically set on the target class member fields.
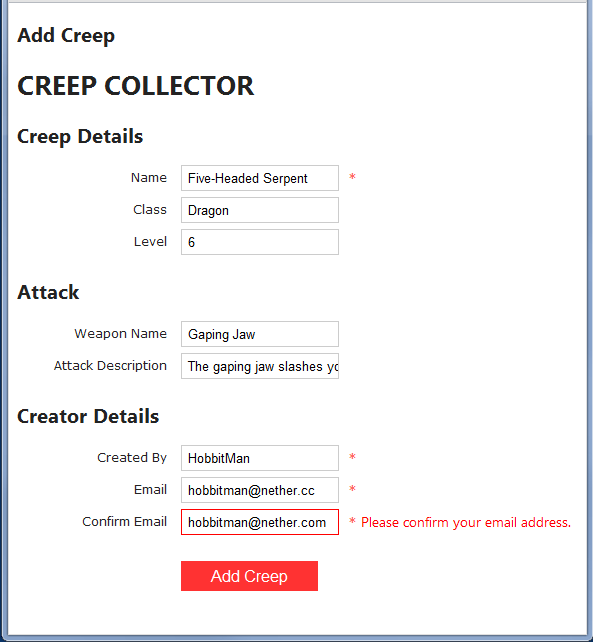
For those familiar with the popular MMO game, Warcraft III or World of Warcraft, our example application will simulate a creep data entry form, allowing a user to enter data for a new creep. Form field validation on the creep data entry form will come directly from data annotations on the class fields, as configured via an XML file.
Moving Data Annotations from C# Code to XML
Normally, hard-coded data annotations within the code are a benefit to maintainability of the C# MVC .NET web application. They allow programmatic access and offer shared functionality for validation logic attributed to the fields. However, in cases where validation should be specified by an external tool, such as a CMS content management system, the validation may need to be driven externally.
The following class uses hard-coded data annotation attributes to specify form field validation:
1 | public class Creep |
In contrast, we’ll be moving the data annotations out of the C# class and into an XML file, defined as follows:
1 |
|
As you can see in the above XML, we can offer considerable flexibility when defining data annotation attributes via XML, including various types of validation, show/hide functionality, and specification of error messages.
Designing the Validation XML Schema
We can begin the process, as shown above, by defining our desired XML schema format. For our example, we’ll specify a class to add data annotation attributes on, along with a list of property names. Each property will specify if it is required, visible, if it contains regular expression validation, comparison validation, and a specific error message to display.
For our example, the complete XML schema appears as follows:
1 |
|
Transitioning from XML to a C# Model
To offer a clean method for loading the XML, we’ll convert the XML to an XSD file and generate the associated C# class model for the XSD template. We can then load the XML from C# code and work with the class model for our validation.
Generating XSD from XML
To generate an XSD from an XML file, we can use the Visual Studio xsd.exe tool. Open a Visual Studio 2010 Command Prompt and enter the following command:
xsd validation.xml
This will produce validation.xsd. You may need to manually edit validation.xsd to specify desired types. For example, xsd.exe assumes most fields are string, whereas we actually want boolean for certain types, as follows:
Edit the xsd and change:
1 | <xs:attribute name="Required" type="xs:string" /> |
to:
1 | <xs:attribute name="Required" type="xs:boolean" default="0" /> |
Finally, we can generate the C# model class from the XSD by issuing the following command:
xsd /c validation.xsd
This will generate Validation.cs which may be added to the Visual Studio solution.
The Model
We can define our Creep model (the main model uses on the data entry form) with a simple class, as follows:
1 | public class Creep |
Notice in the above code, we are not defining hard-coded data annotation attributes. Validation attributes will be defined in the XML file and loaded at runtime.
Loading XML Validation
With the MVC .NET models defined, we can create a manager class for loading the XML validation schema, as follows:
1 | public static class ValidationManager |
In the above code, the first private member field deserializes the XML file and loads the contents into a static variable, as generated by the xsd.exe utility tool.
A Need for Speed
Since our dynamically loaded data annotation attributes will be loaded from XML and set on each class member field, as defined, we’re going to need to be efficient and fast when accessing the list of data annotation attributes and finding the one we need. We can do this with a Dictionary (similar to a hash). Our key into the dictionary will comprise of two parts: the class name and the member name. The resulting value will be a validation property object. For example: Validators[“Contact”][“FirstName”].Required
This method allows us to quickly access the XML configuration for a particular class’s member field without having to loop to search.
Creating a Custom Model Validation Binder
With our C# MVC .NET data annotation form validation loaded from XML, the next step is to dynamically apply the configuration to the class member fields. We can do this by dynamically creating data annotation attributes on the member fields with a custom model validation binder.
First, we’ll add a line to the Global.asax.cs to inject our custom model validator provider:
1 | protected void Application_Start() |
This will call our custom model validator provider each time a model class is instantiated, automatically adding the data annotation attributes as defined in our XML.
1 | /// <summary> |
The above class inherits from DataAnnotationsModelValidatorProvider, which allows us to dynamically specify data annotation attributes. This class is where most of the work happens, specifically, in the GetValidators() method. In this method, we first confirm the ContainerType and class name to exist within our loaded XML. This indicates if the current class should have dynamic data annotations applied. Assuming it exists within the loaded XML, we then check the property name. If we have a key defined in the XML for the current property name, we can proceed to process the property’s visible attribute, required attribute, regular expression attribute, and comparison attribute. We bind the actual data annotation class type to the property, creating a true C# MVC .NET data annotation for the property.
MVC Data Annotations Plus
Since we’re defining our own method for injecting C# data annotations, we can take it a step further and allow easy definition of required fields for different types (string, int, bool). We know the type, based on the metadata.ModelType. Therefore, we can enact specific assumptions for required attributes on differing types. For example, for the case of a string, we simply add the Required attribute. For the case of a boolean, we can add an EnforceTrueAttribute. For the case of an int, we can add a GreaterThanZeroAttribute (note, the assumption here is that a positive integer is required).
Likewise, for custom validation, we insert a RegularExpressionAttribute and use the regex as defined in the XML for the property.
It’s Magic
WIth the data annotation manager code complete, we now automatically inject C# data annotation attributes on the class fields. This is done automatically when a class is instantiated. No additional work is required.
Adding Logic to the View
To take full advantage of the XML data annotation attribute configuration, we’ll need to add some logic to the view. This will allow us to enable the show/hide property and automatically draw an indicator if the field is required or not.
Each field in our MVC view’s form will contain logic, as follows:
1 | (ValidationManager.Validators["Creep"]["Name"].Visible) |
In the above block of logic, we check the validation dictionary for the current class property to determine if the field is visible. We include an inner logic check to draw a required asterisk indicator if the field is a required field, as configured in the XML file.
The Simple Controller
We can implement a basic controller for our MVC web application form and check the validation in the normal fashion. The data attributes that are dynamically added to the class will function as true hard-coded data annotation attributes.
1 | public class HomeController : Controller |
Notice, in the above code we simply check ModelState.IsValid on the server-side. Client-side validation is automatically enabled as well.
Complete External Control
WIth the system defined, we can now fully control form field validation by changing the configuration of the XML file. Simply set a property’s Visible option to false and the field will be hidden from the view. Change the error message, regular expression for a password, add/remove fields, etc.
The real power comes when connecting the XML file to be driven from a 3rd-party tool, such as a CMS content management system. The CMS can automatically drive the XML configuration, setting and changing properties as driven by the user. Changes to the XML file will, in turn, change the form field validation on the end C# ASP .NET MVC web application.
See It In Action
Download @ GitHub
You can download the project source code on GitHub by visiting the project home page.
About the Author
This article was written by Kory Becker, software developer and architect, skilled in a range of technologies, including web application development, machine learning, artificial intelligence, and data science.
Sponsor Me